Automating LFS
If you’ve used the LFS book already to build your own Linux system, you’ve probably spent a long time copying and pasting snippets of shell script code from the book into a shell, and checking the output of the commands.
If you’ve ever felt that such a repetitive, manual, time-consuming effort should really be delegated to the machines, you’ve come to the right place.
In this repository you’ll find a set of python scripts that automate the repetitive task of executing snippets of shell code from the book, taking you from zero to the Linux prompt without human intervention. This documentation describes the scripts and how they’re used:
- if you just want to get the job done, jump to Just build it and follow the instructions
- if you’re curious about the internal workings, read the How does it work ? section,
- if you want to support a new version of the book, go to Adjusting to a different version.
Just build it
As of version 0.1, in April 2020, pkg_lfs comes configured for 3 versions of the LFS book:
- 9.0-systemd
- 9.1-systemd
- 9.1
If you are happy building one of these, just go ahead with the following instructions. If you want to build from a different version of the book (perhaps because a new one has been published, more recent than this package), then there are a few more steps to go through, described in Adjusting to a different version.
Using pkg_lfs to build your LFS system is accomplished in just a few steps:
- prepare a disk partition
- set a few configuration variables
- run a python script to generate the bash shell scripts
- launch the actual shell script
- come back after a few hours and boot your new Linux system
Installation and requirements
To install the package, “git clone” the repository from https://github.com/joaomdsc/pkg. Cd to pkg/lfs inside the directory where you cloned.
Pkg_lfs uses the ‘bc’ command for SBU calculations in the shell scripts, you might want to install it if your distribution doesn’t have it.
Prepare a disk partition
Select or create a partition for LFS as described in section 2.4 of the book, just like you do when building manually. You may leave the partition unformatted, the scripts will create the filesystem in it.
Note the name and number of the partition, you will need to put them in variables, see the next section Set variable values.
The configuration in the repository uses just one partition and no swap, so at this point there is nothing more to do on partitions. If you prefer a different setup, with swap or maybe more partitions, jump to section Adjusting to a different version to see how to adapt your configuration.
Set variable values
Set the variable values in file pkg/lfs/config.py. The following variables are essential to the build process:
- linux_partition, linux_part_nbr: set this according to the partition you’ve prepared for the LFS builds. For example, if you set aside partition /dev/sda5 to build LFS in, then set linux_partition=’sda5’ and linux_part_nbr=’5’.
- lfs_build_dir: the mount point for the LFS partition
- grub_cfg_path: path to the grub.cfg path on your host. This path is
- distribution-dependent, typically /boot/grub on debian but /boot/grub2 on fedora.
All the other variables (e.g. keymap) are used as well, typically to populate various system files, so you should definitely assign values to them. They are just less critical because they are used to configure the target system, rather than to control the build process itself, and you will always be able to configure the target system once it has been built and booted.
Do not set values for pkg_repository, lfs_version and kernel_version: these variables are dynamic, their values will be set by the python code when the scripts are generated.
Working directories
Pkg_lfs needs some place on your computer to keep files around in between builds, so as to avoid downloading large files (like the package archive files) multiple times. This directory will be referred to as LFS_DATA in the documentation.
By default, pkg_lfs will use $HOME/lfs for LFS_DATA. If you want it to use a different directory, set the LFS_DATA environment variable with the desired path (don’t include the {version} part).
If you have already downloaded source packages for a given version of LFS, you can copy them into LFS_DATA/{version}/pkgs, so they’ll be reused and not downloaded again.
Pkg_lfs will also use /var/tmp/lfs/{version} as a place to persist files that must be preserved between reboots, so you can interrupt a build if needed and re-start it the next day, for instance.
These directories will be created if they don’t exist.
Generate the shell scripts
“Don’t take the name of root in vain.”– Linus Torvalds, in kernel README
You are now ready to generate your python scripts. Cd to pkg/lfs in the directory where you cloned the repository. Run the following command as a non-privileged user:
python parse.py 9.1-systemd
(or replace 9.1-systemd with the version id of your choice). Note that the scripts do not include a shebang line, so you may need to specify a specific python interpreter: for instance, if you’re on a debian system that still has python 2 and 3, you will need to specify python3.
On the first run, with no packages available locally, you should see the following text:
LFS_DATA: defaulting to /home/joao/lfs/9.1-systemd
No LFS book found, downloading "LFS-BOOK-9.1-systemd-NOCHUNKS.html" from the web.
Downloading all packages, this may take a while
At this point, around 480 Mb of source packages are being downloaded from the web.
Verifying all checksums
Determining archive sub-directories, this may take a while
tarfile.open: md5sums: file could not be opened successfully
Messages saying “file could not be opened successfully” can be safely ignored.
Packages are present in /home/joao/lfs/9.1-systemd/pkgs
Found 78 pkgs, 137 sections
5.36: apply_directive: writing "/var/tmp/lfs/9.1-systemd/script_02.sh"
5.36: apply_directive: writing "/var/tmp/lfs/9.1-systemd/script_01.sh"
6.80: apply_directive: writing "/var/tmp/lfs/9.1-systemd/script_04.sh"
6.80: apply_directive: writing "/var/tmp/lfs/9.1-systemd/script_03.sh"
9.03: apply_directive: writing "/var/tmp/lfs/9.1-systemd/script_05.sh"
gen_code: writing "/var/tmp/lfs/9.1-systemd/script_00.sh"
In directory /var/tmp/lfs/9.1-systemd you should now have several files:
- files named script_0?.sh are the actual scripts that you will run to perform the build
- files named *_expected.txt and *_script.sh are used to check the outputs of some of the shell commands from the book (see Checking outputs for details of this mechanism).
Don’t hesitate to actually read the scripts (see Generating shell scripts for background information). The python code goes to great lengths to document and comment the book’s sections and code snippets as they are output to the script files, so if you’ve practiced the book instructions, you will find the contents of the scripts very familiar.
Run the generated scripts
You can now perform the actual build. Log in as ‘root’.
Warning
This program is free software, distributed under the GPL 3.0 licence; as such, it comes with ABSOLUTELY NO WARRANTY. Use at your own risk. Do not use it, if you don’t know what you’re doing. Back up your data. Do not run this on an important machine. This program might render your host system unusable and unbootable. You have been warned.
Run the following commands:
root@debian:~# script
Script started, file is typescript
root@debian:~# bash /var/tmp/lfs/9.1-systemd/script_00.sh
(or replace 9.1-systemd with the version id of your choice). Script is used to capture all the output from the scripts, which will run up to 80 or 100 Mb of text.
The script runs entirely unattended, with two exceptions:
- the first time you build the linux kernel, you will be prompted for the kernel configuration parameters. See Configuring the kernel for instructions on how to handle this, and how to reuse the .config file to avoid being prompted again.
- once you’ve created a file system on the partition, on every new build the
mkfscommand will detect an existing file system and prompt you for confirmation (this happens just a few seconds after starting the script).
Running the script can take several hours. For example: building on a Debian 10.2 (or Fedora 31) host, running with 4 Gb ram inside VirtualBox 6.0 on a Windows 10, where the underlying hardware is an 8-core Intel i7-7700HQ with 16 GB ram, the total build time is between 10 and 12 hours (1 SBU = 2’30”).
While the script is running, you can look at the ‘typescript’ file to follow the build’s progress. There are a few interesting things to look out for:
- each section that builds a software package prints a summary line with the elapsed time and corresponding SBU value
- some code snippets include a test on the output (grep for ‘Check:’)
- a warning is output when a command returns a non-zero code
To extract the above information from your ‘typescript’ file, paste the following command into a shell:
grep -E '(Error:|Check:|\(expected)' typescript | grep -v "echo Check"
Here’s an example of the output you will get:
Check: 2.02: no errors detected.
Error: 2.07_0.5 [add] returned exit code 1
5.04: 00:02:33 = 1.0 SBUs (expected 1.0), total: 1.0 (expected 1.0), target 200.4
5.05: 00:21:58 = 8.6 SBUs (expected 10.0), total: 9.6 (expected 11.0), target 200.4
5.06: 00:00:19 = 0.1 SBUs (expected 0.1), total: 9.7 (expected 11.1), target 200.4
Check: 5.07_05: output is as expected.
5.07: 00:11:23 = 4.4 SBUs (expected 4.5), total: 14.1 (expected 15.6), target 200.4
5.08: 00:01:13 = 0.4 SBUs (expected 0.5), total: 14.5 (expected 16.1), target 200.4
5.09: 00:02:56 = 1.1 SBUs (expected 1.1), total: 15.6 (expected 17.2), target 200.4
Check: 5.10_10: output is as expected.
5.10: 00:32:02 = 12.5 SBUs (expected 13.0), total: 28.1 (expected 30.2), target 200.4
If everything goes well, after a few hours the last lines in the output will look like this:
#-------------------------------------------------------------------------------
# Snippet 9.03_02
#-------------------------------------------------------------------------------
# umount -v $LFS
#-------------------------------------------------------------------------------
umount: /mnt/lfs unmounted

#===============================================================================
# End of /var/tmp/lfs/9.1-systemd/script_00.sh
#===============================================================================
Exit the script command. You may now skim through the typescript file to see
if there were any serious errors, and boot the system.
Booting your new system
The shell scripts differ from the book in how they handle the boot loader step: grub is not installed on the target system, instead, a menu entry for the new LFS system is added to your host’s grub.cfg file. So if you now boot your system, you should see an entry for LFS such as the following:
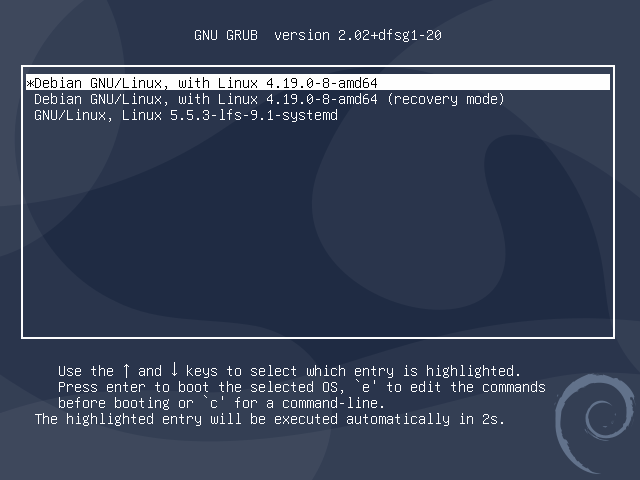
The last entry in the menu (with the 9.1-systemd version) is the one added by the pkg_lfs scripts. Select it, and press enter to boot:
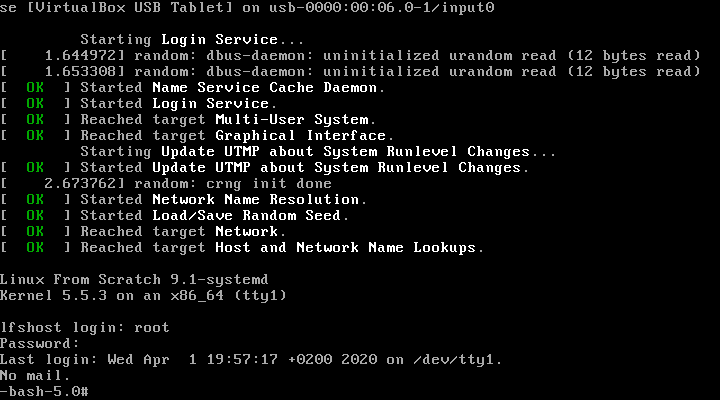
You can login as root, with password abcdef01 (see the section for the
Shadow package in adjust_{version}.py). Enjoy your new LFS system!
Resuming an interrupted build
Building an entire LFS systems takes several hours. If for some reason you need to stop your computer, you can interrupt the build at any time with Ctrl-C. The work that has been done is not lost, except for the last code snippet that was being executed.
To resume building, you should first edit the scripts to remove parts that you don’t want to run again. This means essentially packages that have already been built, whose binaries and libraries have been installed already, you needn’t waste time re-building them.
Start by reading the How does it work ? section, and make sure you understand the interaction between the different scripts, and the mechanism used to exchange data between the host system and the chroot’ed environment.
In particular, be careful never to remove snippet 2.07_0.5 in
script_00.sh: this copies several files, including the scripts themselves,
to the LFS partition, because once you’re inside the chroot’ed environment, the
original location is no longer accessible.
If the scripts were in the middle of a package build, then probably a tar file has been unpacked, the script did a ‘cd’ into the subdirectory, configure and make were run (check your typescript file):
- in that case, the build directory is no longer in its pristine condition, so you should manually delete the entire sub-directory for this package to avoid mysterious errors in the next build. Be sure to preserve the lines that unpack the tar file and do the ‘cd’ into the build directory in the scripts.
- alternatively, if one of the very large packages like glibc or g++ was
interrupted in its
make checkphase, it’s worth preserving the build directory as it is, because the package has been built. In that case, edit the script to remove the ‘tar’ invocation, remove the steps up to the ‘make’ but be careful to keep all the ‘cd’ commands so as to restore the same state the script was in when starting ‘make check’.
Configuring the kernel
The shell scripts from the book invoke “make menuconfig” to configure the kernel. This runs an interactive ncurses application in your terminal (and interrupts the script run), which you can navigate in order to set specific kernel parameters if you want.
If you just want to get your LFS system up and running, you can just save the configuration without making any changes.

Using the arrows keys, select Save, confirm the name ‘.config’, then Exit. As soon as you exit the ncurses application, the build script continues executing and the linux kernel is built.
The scripts generated by pkg_lfs will also save the kernel’s .config file to /var/tmp/lfs/{version}/config.{kernel_version} right after the “make menuconfig” step, and they will reuse this file in subsequent builds by copying it back into the source directory right before the next “make menuconfig” step.
Since a .config file will now be present in the directory, the next builds can skip the kernel configuration step, which will let the script run to completion without interruption: to achieve this, you could edit script_05.sh directly, to remove or comment out the line; or better still, you can edit adjust_{version}.py and uncomment the line which instructs the python code to ignore snippet #3 in section 8.03:
########################################################################
# Snippet #3 is the 'make menuconfig' step. It needs to be run the
# first time, to produce a .config file, so initially we do not ignore
# the snippet (keep it commented out).
#
# Uncomment the next line after a first kernel has been built, and a
# config file has been saved to /var/tmp/lfs/{version}, that file will
# be reused.
# (3, 'ignore'),
########################################################################
Re-generate the shell scripts by running python parse.py again. This new version now ignores the ‘make menuconfig’ step.
How does it work ?
This section details what’s going on behind the scenes when you use this package. You will find it useful if you want to edit the scripts before resuming an interrupted build, or if you want to adjust the book’s default behaviour to suit your personal tastes, or to support a new version of the book.
Generating shell scripts
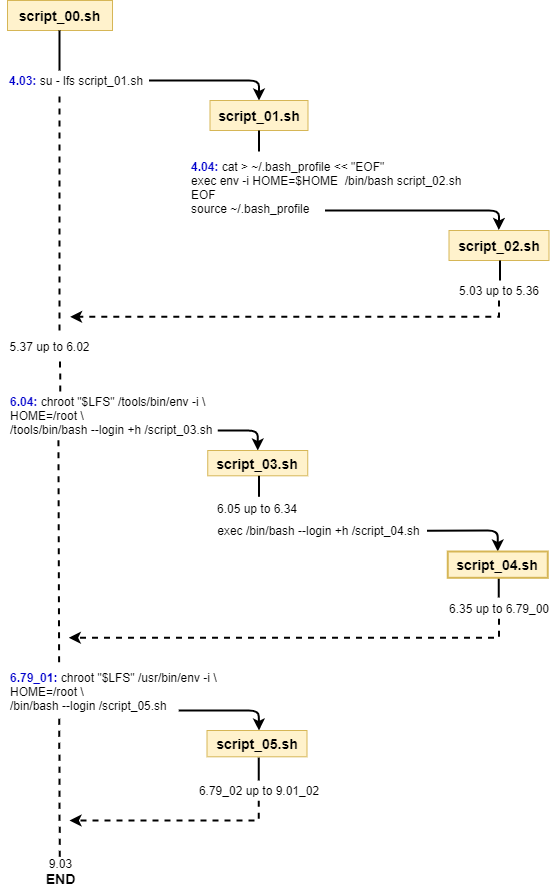
Pkg_lfs parses the HTML file of the LFS book, extracts all the scripts, and generates a number of separate bash scripts which call each other in sequence to get the job done.
The reason we need more than one script is that, on several occasions, the instructions in the book call for restarting the current shell (when doing a chroot, an exec, or an su command). While this is straightforward when you’re applying the instructions interactively, it becomes somewhat tricky when you’re generating script code.
The solution is to change the file that the code is being written to everytime one of these commands appear. The python scripts use a stack where code and script filenames are pushed and popped as needed (see the directives structure in adjust_{version}.py. The following diagram shows the overall logic:
Code snippets from the book
The Typography section describes two different formats for the snippets of text that appears in the book inside gray boxes:
- one in boldface, designed to be typed by the user exactly as seen.
- the other (fixed-width text) shows screen output, usually as the result of commands issued.
The first format is for shell script code that the user is supposed to type;
the corresponding html element in the book has an attribute
class="userinput".
The second format corresponds to elements with class="screen". These are
mostly ignored, except when checking output (see next section).
The python scripts use the class attribute to identify the role of each snippet. Userinput code snippets are copied into the shell scripts to be executed. Each snippet is documented by echoing itself (as in the bash ‘echo’ command) before actually running the commands, so that a user looking at the resulting output (the log file) will know what command was run. Code is also generated to test the exit code returned and output a warning message if that code is not zero.
For example, the first code snippet in section 6.9 of the book is a patch command, here’s how it appears in the book:

Here’s how the same snippet appears in the script_03.sh file:
echo '#-------------------------------------------------------------------------------'
echo '# Snippet 6.09_00'
echo '#-------------------------------------------------------------------------------'
echo '# patch -Np1 -i ../glibc-2.31-fhs-1.patch'
echo '#-------------------------------------------------------------------------------'
patch -Np1 -i ../glibc-2.31-fhs-1.patch
err=$?
if [ $err -ne 0 ]; then
      echo Error: 6.09_00 returned exit code $err
fi
And here’s what appears in the log file:
#-------------------------------------------------------------------------------
# Snippet 6.09_00
#-------------------------------------------------------------------------------
# patch -Np1 -i ../glibc-2.31-fhs-1.patch
#-------------------------------------------------------------------------------
patching file Makeconfig
Hunk #1 succeeded at 245 (offset -5 lines).
patching file nscd/nscd.h
Hunk #1 succeeded at 161 (offset 49 lines).
patching file nss/db-Makefile
patching file sysdeps/generic/paths.h
patching file sysdeps/unix/sysv/linux/paths.h
Checking outputs
Snippets of class ‘screen’ are often just examples of file contents, they will be ignored by default, and not appear in the generated script code. But sometimes, when a ‘screen’ snippet follows a ‘userinput’ snippet, it holds the output that is expected from running the commands in that snippet (see the sanity check on the new toolchain in section 5.07, for example). In that case, the pkg_lfs python code will generate shell script code that tests whether the actual output matches the expected output.
In order to generate the test, the snippet code and the expected output are both written to separate files, and shell code is generated to run the script file, perform a ‘diff’ with the expected output, and print the result. Grep for ‘Check:’ in the log file if want to see to see this information.
In cases where a ‘screen’ snippet happens to follow a ‘userinput’ snippet but with no relation between the two, a directive is required to ignore the snippet and avoid generating a meaningless check.
Adjusting to a different version
The git repository comes pre-configured for versions 9.0-systemd, 9.1, and 9.1-systemd of the book. If you want to build from a different version, there are a few extra steps that need to be taken, described in the next sections.
Adjust the directives
The ‘directives’ dictionary (defined in adjust_{version}.py) offers a mechanism to customize the instructions from the book. For example, the version in the repository builds a system with a single partition, with no swap, and it does not install grub, relying instead on the host’s installed grub to boot the new LFS system.
You can change this behaviour by adjusting the directives to modify any shell code snippet (with a ‘replace’ directive), or by adding new script snippets (with the ‘add’ directive).
The new text that you write represents either shell script code, or some file contents. In any case, the python code will perform variable substitution on that text: placeholders are denoted by the <code>xxx</code> construct, and they will be replaced with actual values using the mechanism described in the next section.
The ‘param_mapping’ structure
The book’s HTML file uses the following structure to denoted placeholders meant to be replaced with actual values:
<em class="replaceable">
  <code>/mnt/lfs</code>
</em>
The parsing step keeps the <code>xxx</code> constructs when extracting the snippets from the book (and you can add them in your own directives), so they can later be found by the replacement code. Note that the character string found in between <code> and </code> in the snippet text is irrelevant, it’s really just a placeholder.
The ‘param_mapping’ structure in adjust_{version}.py maps placeholders in the snippets to variables in config.py, or to specific values to be replaced, based on their position. This is how the code gets configured for your specific setup.
Mapping a new version
A new version of the book usually brings new versions of the existing packages, but it may also include new packages (9.1 introduced Zstd, for example). When you want to support a new version, you need to go through the book section by section, determine what has changed since the last version you worked with, and how you need to adapt the code.
As described in the previous sections, the behaviour of the generated code is controlled through three different data structures:
- directives
- param_mapping
- variables
Through the ‘directives’ structure, you can tel the python code to ignore certain code snippets or entire sections, you can change existing behaviour by replacing code snippets, and you can add entirely new code.
To help you find placeholders that need replacement in a new version of the book, you can run the following command:
python explore.py <version>
replacing <version> with your chosen version. This will create a param_mapping.py file in LFS_DATA/{version} with placeholders from the book. It’s a starting point for your configuration, that must be completed as you edit the directives below.
The ‘variables’ structure will need to be updated if there are new placeholders that represent information that was not required previousy.
After updating these three data structures, run the parsing and generation step again:
python parse.py <version>
You will have a new directory under LFS_DATA, and another one under /var/tmp/lfs. You can now re-run the build scripts.
Known issues
SBU calculations cannot be done in chapter 6 because the bc command is not built in chapter 5.
Future directions
What to expect from future versions:
- extend the code to support BLFS
- remove dependency on the sections’ numerical ids, as they are liable to change from one version to the next one
- better support for restarting an interrupted build: automatically detect what has been done, avoid having to manually edit the script files
- better logging, separate high-level log from the details of each package build
- generate the param_mapping structure from both the book and the directives structure.
- save the results of the parsing phase into a python or JSON file that a user could use as the starting point for changes and customization.
- implement a ‘diff’ operation on the post-parsing python/JSON representation of the book, to make it easier to add support for a new version
The current version already includes code for saving/restoring the python objects built from book parsing into/from JSON.
Section author: Joao Moreira <joao.moreiradsc@gmail.com>